Happy Lunar New Year! 迎春接福, 花开富贵

Chinese New Year is also known as the Lunar New Year, or the Spring Festival (春节).
It marks the beginning of Spring and the holiday marks the end of the coldest days. People welcome spring and what it brings along: planting and harvests, new beginnings and fresh starts.
This project will let you plant flowers onto a barren tree to create a beautiful Chinese painting that you can share and send to your friends and family.
It is suitable for Beginners.
Remixing the Template
To start off, let’s pick up this template and remix it to get the graphic assets.
https://scratch.mit.edu/projects/360684607/
Be sure you type the address correctly or you might not get the right project!
Click the Remix button to create your very own copy of the project.
Once you’ve done this, the Scratch coding window will appear.
STEP 1 - Getting to know the Sprites
When you first open up the project, you will see that it has 5 different Sprites.


A Sprite is an object in Scratch that can perform actions.
For this project, you will only need to code the cherry-blossom Sprite. This Sprite will be the Sprite that produces the flower blossoms you will see.
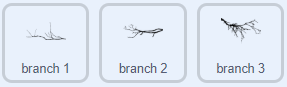
These branch Sprites are just there for you to decorate with flowers. They do not need any code. You can drag them around to reposition them if you want.

This is a greeting Sprite that you can personalise.
STEP 2 - Coding the Cheery-Blossom Sprite
We’re going to program the cheery-blossom Sprite so that when you click on your mouse, you will create a clone of the flower on the Stage.
The stage is where all the actions take place! It’s the background of the project, and it is 480 pixels wide and 360 pixels tall.

Make sure all the code goes inside the cheery-blossom Sprite!

First, drag and assemble these blocks inside the Code Area (the large area where blocks are assembled). These codes will add a slight transparency effect to the flowers and put them in front of the other Sprites, so we can see them.And it’ll hide the flower when we don’t need it.
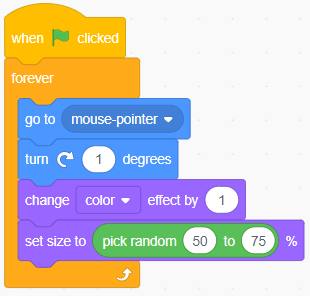
Next, drag and assemble these blocks inside the Code Area.
The Forever block is one of the most commonly used blocks in Scratch. It creates a loop to make sure certain actions keep happening.
In this case, we want the cheery-blossom Sprite to always follow the mouse pointer.And to always be turning slightly and changing its colour, and size. This is to make the flowers look different.

Finally, drag and assemble these blocks inside the Code Area. Again, we are using the Forever loop block. In this case, we are using it with an IF condition block. The IF block checks if a condition is true. If the condition is true, the code inside the block would run, but if the condition is false, nothing would happen. In this case, we are checking if the user is clicking or holding down the mouse button. If yes, then we want the flower to show itself and create a copy of itself.
You can now run the program by clicking the green flag It should work pretty well. You can click around the stage, and a flower should appear. You can now turn the barren branches into flowering trees!
STEP 3 - Customising the Greeting
There is one final step before you can share your project: Customising the New Year greeting. You will notice that you can make the greeting appears if you press the space bar.

Click on the Sprite.

And then click on the Costume tab at the upper left of the screen.

This is the Paint Editor. It is Scratch's built-in image editor, which allows you to edit images, draw graphics, change colours of Sprites and Background etc
If you click on the and click on the text box, you’ll be able to customise your own messages to your friends and family.
If you click on the “T” and click on the text box, you’ll be able to customise your own messages to your friends and family.
You can also edit the graphics, add new graphics, draw your own design etc. Unleash your creativity!
How to share the project

Now that you have completed a project. Be sure to save it using the File menu.
You can share your project in many ways.

One, you can click on the Share button which will allow your project to be view by others. Then you can simply send your friends the URL of your project.

Two, you can right-click on the stage when the project is running and save the project as an image. You can then send this image to your friends.

We are excited to see what you have created!
Sign up for for a trial class and experience a new way to learn to code.
Join our mailing list or follow us on Facebook to stay updated with our latest projects.